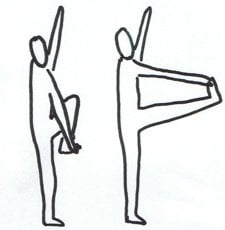
Are you looking for a way to strengthen and tone your legs and hips? The yoga pose Utthita Hasta Padangusthasana (also called raised hand to big toe pose) is exactly what you are looking for.
A little warning before we get started: if you suffer from sciatica (lumbar radiculopathy) or hip and/or knee pain, contact your doctor before attempting this asana.
Other variations exist for the yoga pose Utthita Hasta Padangusthasana and I will provide two on this page. For more information on poses other than yoga pose Utthita Hasta Padangusthasana, click here.
Yoga Pose Utthita Hasta Padangusthasana: Variation 1
- 1. Make sure that your yoga area is free of obstructions. This asana is relatively difficult for those of us who are balanced-challenged…

- 2. Stand up with your feet together. Breathe in. Relax all your muscles. Breathe out.
- 3. Gently focus your gaze on a point in front of you.
- 4. Bend your right knee and try to bring your thigh as close to your body as possible. Exhale.
- 5. Place your right arm on the outside of your bent leg and grab your big toe. Inhale.
- 6. Exhale as your straighten your leg in front of you. Raise your left arm to balance yourself. You may not be able to fully extend your leg at first (i.e., your knee may not want to unbend fully). Don’t worry, that’s normal. Keep practicing and your flexibility will improve.
- 7. Breathe in and breathe out as you try to raise your extended leg a little higher.
- 8. Breathe in and breathe out for up to a minute in the final position. Don’t worry if you only last a few seconds. You can also repeat 3 to 5 times to improve your form and flexibility if you were unable to keep the pose for a minute.
- 9. Repeat with the other leg.
Benefits of Utthita Hasta Padangusthasana
The benefits of the yoga pose Utthita Hasta Padangusthasana are as follows:
- It strengthens and tones your legs
- It strengthens and tones your hips
- It improves concentration
- It improves balance
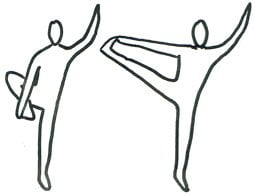
Yoga Pose Utthita Hasta Padangusthasana: Variation 2
In this variation of the asana, instead of extending your leg forward, you will be extending it sideways.
- 1. Once again, make sure your immediate area is clear and that you won’t hurt yourself should you lose your balance and fall.
- 2. Stand up with your feet together. Take a deep breath in. Relax and breathe out.
- 3. Pick a point in front of you and gently focus your gaze on it.
- 4. Bend your right knee and bring your right thigh as close to your body as possible. Exhale.
- 5. Place your right arm on the inside of your bent leg and grab your big toe. Inhale.
- 6. Pivot your raised knee towards the outside, to the right.

- 7. Exhale as your straighten your leg to the side. Raise your left arm to the side to balance yourself. You may not be able to fully extend your leg at first but don’t worry, that’s normal. Your flexibility will improve with time.
- 8. Breathe in and breathe out as you try to raise your extended leg a little higher.
- 9. Keep breathing as you stay in this final position for up to a minute in the final position.
- 10. Repeat with the other leg.
Note: If you are only able to stay in the position for a couple of seconds, you can repeat the process another 3 to 5 times to improve your form and flexibility.